A fresh coat of paint can breathe new life into any room, but the best results are achieved on a well-prepared surface. We periodically find ourselves stumped by a crack that we don’t know how to mend just as we are preparing to paint or plaster a surface. Before painting or plastering walls, We must repair the cracks. In fact, if the fracture is not properly fixed, it will eventually reappear over the fresh coating.
Cracks in walls are not only unsightly, but they can also affect the final finish of your paint job. Properly repairing these cracks before painting is paramount to ensuring a smooth and long-lasting finish. In this article, we’ll guide you through the process of repairing cracks in walls before painting, step by step.

Materials You’ll Need
Before you begin, gather the following materials:
- Spackling compound or joint compound
- Putty knife
- Sandpaper (medium and fine grit)
- Primer
- Paintbrushes
- Paint that matches the existing wall color
Steps to repair cracks in walls before painting
-
Assess the Damage
Start by assessing the cracks in your walls. Determine whether they are superficial hairline cracks or deeper fissures that require more extensive repairs. Superficial cracks are typically caused by minor settling or temperature changes and can be easily fixed. Deeper cracks may indicate underlying structural issues and should be inspected by a professional before attempting any repairs.
-
Prepare the Area
Clear the area around the cracks of any furniture, decor, or debris. Cover the floor with a drop cloth to catch any spackling compound or dust that may fall during the repair process.
-
Clean the Cracks
Use a damp cloth to clean the cracks and remove any dust, dirt, or loose particles. This ensures a clean surface for the spackling compound to adhere to.
-
Apply Spackling Compound
Using a putty knife, apply spackling compound or joint compound to the cracks. Start with a thin layer, pressing the compound firmly into the cracks. For larger cracks, you may need to apply multiple layers, allowing each layer to dry before applying the next. Follow the manufacturer’s instructions for drying times.
-
Sand the Surface
Once the spackling compound is completely dry, use medium-grit sandpaper to smooth the repaired area. Sand gently in a circular motion until the surface is even and blends seamlessly with the surrounding wall. Wipe away any dust with a clean, damp cloth.
-
Apply Primer
Applying a coat of primer is crucial to ensure the repaired area absorbs paint uniformly. Use a paintbrush to apply a thin layer of primer to the patched area and let it dry according to the manufacturer’s instructions.
-
Match the Paint
To achieve a seamless finish, it’s important to match the paint color of the existing wall. If you have leftover paint from the original job, use that. If not, take a paint chip or sample to a hardware store to find the closest match.
-
Paint the Repaired Area
Using a paintbrush, carefully apply the matched paint to the repaired area. Feather the edges to blend the new paint with the surrounding wall. Allow the paint to dry completely before assessing the color match. If necessary, apply a second coat for a consistent finish.
-
Inspect the Result
After the paint has dried, inspect the repaired area for any imperfections. If you notice any inconsistencies, you can lightly sand the area with fine-grit sandpaper and apply an additional coat of paint.
-
Final Touches
Once you’re satisfied with the repair, clean your brushes and dispose of any used materials properly. Return furniture and decor to their original positions.
Products for patching plaster cracks
Before painting or plastering a wall, if a crack needs to be repaired, use the proper materials. The list of crack-repairing products that we suggest utilizing is shown below.
-
AntiCrack
It is a versatile plaster for both indoor and outdoor use. It significantly increases the impact resistance and durability of drywall construction while lowering the likelihood of cracking on drywall and other plasters. On drywall and antique plaster restorations, anticrack is crucial. For plasters made of lime and gypsum, this is the perfect foundation. Before painting or plastering, Anticrack can be used to fix structural cracks in walls. Apply a 6 cm wide strip of narrow fiberglass mesh tape along the crack first. Next, secure the mesh to the surface with an anticrack layer. After that, apply a wider mesh tape (say 30cm) over it to fix the crack but let this be after the plaster has dried.
-
Plaster for Leveling Gaps
It is a plaster that has a strong bonding power and won’t shrink as it dries. We use it to fill gaps between tiles on walls and floors before applying plasters due to this characteristic. Because of its ability to adhere, it can be applied directly to marble and tiles as the initial coat before plastering them. Our Gap Levelling Plaster can be used to patch fractures in tiled floors. First, apply fiberglass mesh tape that is 1 m wide to the entire tiled floor. The bands should be placed side by side, not overlapping. After that, use our Gap Leveling Plaster (GLP) to secure them to the surface. Apply the desired plaster to it once it has dried.

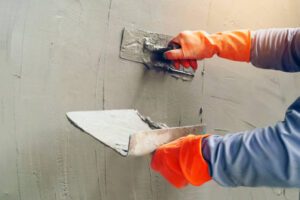
- Hand image worker Concrete plaster
Major masonry or rebuilding work-related cracks
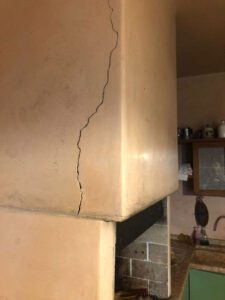
On occasion, you’ll also discover cracks for which the only option is to correctly replace the masonry structure. For instance, the expansion of the interior metallic hood, to which the masonry construction had been inadvertently linked, caused the split in this fireplace hood. When the fireplace’s temperature suddenly rises, the metallic hood and the bricks react in two different ways, which causes fractures in the brickwork when the fireplace is leaning on the hood. The only option we came up with was to plasterboard over the fireplace hood and glue it with a flexible adhesive. We then placed our Venetian Plaster over it once more.

- A Marmorino Venetian Plaster-finished crack on a fireplace hood.
How to fix flooring cracks
The issue in floors has several parts, but comparable remedies. Typically, when plastering a floor, we either work on fresh screeds or worn-out tiles. Before putting a plaster covering on top of fresh screeds, they must dry for at least 3 weeks. In fact, this is the time when significant withdrawals take place, which can influence the development of fractures.
When the screed on the floor is new
In this instance, the procedure for fixing floor cracks is the same as what we have seen for wall cracks. Apply a thin mesh along the crack first, then use our Anticrack or another fibrous plaster to secure it to the surface. then use mesh bands that are 100 cm wide and affix them side by side thus covering the entire floor
With the first layer of plaster chosen for the final finish, you can secure the wide mesh bands to the floor if the screed is brand-new. For floors, for instance, you can use our Pastellone – Venetian Plaster. The mesh should first be secured with a layer of very fibrous and adhesive plaster, such as our Gap Leveling Plaster – GLP, if the floor is tiled or marbled.
Along the fissures is a fine mesh. It will then be secured to the surface using fibrous plaster. Then, mesh bands will be placed all over the floor.
The cracks were initially patched with a fine mesh and secured to the surface with a fibrous plaster. You can now apply wider mesh bands to the entire floor
Conclusion
Repairing cracks in walls before painting is an essential step to achieve a flawless and long-lasting paint job. By following these step-by-step instructions, you can effectively repair cracks, both large and small, and achieve a professional finish. Remember to take your time and pay attention to detail, as proper preparation will ensure that your paint job stands the test of time. With a well-prepared surface, your freshly painted walls will look stunning and bring renewed vibrancy to your space.
FAQ on How to repair cracks in walls before painting
1. How do I prepare the cracked area for repair?
Start by cleaning the area to remove dust, debris, and loose paint. Use a scraper or utility knife to gently remove any loose or flaking material around the crack. Sand the area lightly to create a smooth surface for patching.
2. How do I repair small cracks?
For small cracks, apply spackling compound directly over the crack using a putty knife. Spread it evenly and feather the edges to blend it with the surrounding wall. Let it dry according to the manufacturer’s instructions, then sand it smooth before painting.
3.How do I repair larger cracks?
For larger cracks, you might need to use joint compound or a drywall patch. Apply the compound or patch over the crack, following the manufacturer’s instructions. Feather the edges, allow it to dry, and then sand it smooth.
4. What if the crack reappears after painting?
If cracks reappear, it might indicate an underlying structural issue. Consult a professional to address the root cause before attempting repairs again.
